‘Reduced, Reused, Recycled’ is one of the most important mottos for green living.
The meaning behind is simple; reduce waste, reuse products when you can and if you can’t reuse it, recycle them into something useful. In the spirit of a green lifestyle, this article is dedicated to telling you 10 DIY projects you can do using recycled materials.

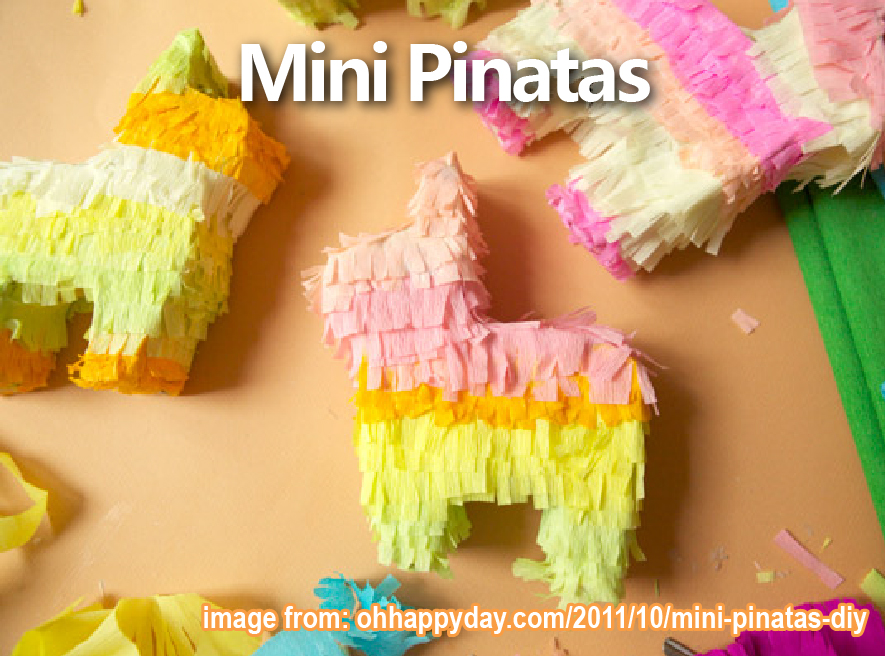
1. Mini Pinatas
Make your own mini piñata; all you need is a cereal box, a pair of scissors, a knife, crepe paper folds, tape and glue.
- Step one: Draw a picture of the donkey (or any other animal) on a cereal box and cut it out with scissors, one for the front and one for the back. Cut out long strips from the cereal box about (1.5” thick) and tape the front and the back together with the strip.
- Step two: Cut off one end of the crepe paper, fold and cut on one side to create a fringe. Then glue the fringe on the piñata, wrapping it around until it is covered. You can leave it here or move on to step three.
- Step three: Cut a small trap door at the bottom to fill with treats like small candies and confetti. Great for a toddler party!

2. Bird feeder
All you’ll need is a small plastic jar, 3 inches of 1/8 inch dowel (round wood), some wire or string, waterproof glue or hot melt glue.
- Step one: Clean a small empty plastic container.
- Step two: Cut a 1-inch hole about 1 to 1 1/2 inches up from the bottom of the container.
- Step three: Make a small hole just below the 1-inch hole and put the dowel in it. Be sure to fix it place with glue.
- Step four: Poke another hole through the lid and pass your string /wire through it and tie a big knot at the end so it doesn’t pull out. Put the lid on the jar, half fill it with grain, and now your bird feeder is ready.

3. T-shirt tote bag
You will need an old T-shirt (the thicker the fabric the better), fabric scissors and a washable marker (optional).
- Step one: Cut off the sleeves.
- Step two: Turn the shirt inside out and cut the neckline area.
- Step three: Determine how deep you want the bag to be and make a line across it.
- Step four: Cut slits from the bottom up to the line marking the bottom of the bag. Cut the slits about 3/4 to 1 inch apart. Be sure to cut both the front and back layers together, they will need to match up for the next step.
- Step five: Take the first pair of fringes and tie it into a knot, then tie two more pairs. Now grab one strand from the middle set and tie it in a knot with one of the strands on the left set. Then take the other strand from the middle set and tie it in a knot with one of the strands on the right set. Then take the remaining strand on the right set and tie it to the next set of strands. Keep going until all the strands are tied.
4. Pencil holders
For this, all you need is an empty shampoo bottle, scissors, a knife, glue, paper and some double-sided tape.
- Step one: Draw a line and cut off the top of the bottle. Don’t throw it away, we will be using it for later.
- Step two: Draw some hands on the top part and cut them out with your scissors.
- Step three: Glue the hands onto the bottom half of the shampoo bottle.
- Step four: Draw a mouth, some teeth and some eyes on the paper, cut them out and stuck them onto the bottom half of the bottle with glue
- Step five: Stick some double-sided tape on the back of the bottle
5. Plant holder
You will need an empty tuna can, and a lot of cloth pegs.
- Step one: Clean out the can.
- Step two: Stick the clothespins around the can.
- Step three: Place your plant inside the can, you can add the dirt indirectly or you can place an already potted plant inside the can.

6. Paper roll art gallery
You will need cardboard tubes like paper towel holders or toilet paper rolls, a pair of scissors or a knife, glue, pictures you would like to stick on.
- Step one: Take your cardboard rolls and cut them to the sizes you want. Make different sizes to add interest and dimension.
- Step two: Take the rings and use them to trace circles around the pictures you want to use. This will help you when you are cutting the picture to fit the rings/frames.
- Step three: Glue the photos to the rings and wait for them to dry. Now use some glue on the side of the rings to glue them together.
- Step four: You can hang the rings on the wall by putting a few push pins or small nails on the wall before-hand and then slipping the rings over them.

7. Recycled soda can lantern
You will need, a soda can, a needle or pushpin, a knife or scissors, a marker (optional).
- Step one: Cut off one end of the soda can.
- Step two: Clean the can.
- Step three: Use your marker to draw the pattern you want on the can.
- Step four: Use the pushpin or needle to pierce holes in the can into the pattern you want.
- Step five: Place a candle inside the can and watch the way the light glows and the shadows it makes.

8. Recycled plastic bottle newspaper holder
You will need some plastic bottles, a pair of scissors, super glue or another strong adhesive, a long strip of wood or an aluminum bar.
- Step one: Cut off the tops of the bottles. Make sure the bottles and the hole are big enough to fit a newspaper.
- Step two: Glue the bottom of the bottles to the bar/piece of wood with super glue or another strong adhesive. Do not cover the entire bar, leave some space on either side, the reason for this will become apparent later.
- Step three: Place your bottle stand wherever you want, for example, you can hammer it onto the wall (this is why we left the space in the previous step) or place it on the ground in a designated space.
Now you can roll up your newspapers and place them into the bottles easily.
9. Cereal box desk organizer
You will need cereal boxes, cardboard rolls (optional), wrapping paper or paint (whichever you prefer), glue, scissors, a knife, tape, pen or pencil, a wooden board and a paintbrush.
- Step one: Cut off the cereal boxes in whatever length you prefer. Do the same for the cardboard rolls.
- Step two: Place the cut boxes and rolls on the wooden board and arrange them how you want them to be in the end, now mark their positions with a pencil or pen (you can paint the board as well if you want, just, make sure to paint it such so that you can still see the markings for later).
- Step three: Now you can either paint the boxes and tubes how you want or you can use glue and wrapping paper and stick the wrapping paper onto the boxes and rolls.
- Step four: place some glue on the ends of the boxes and tubes which you are planning to stick on the board and place them there and wait for it to dry.
10. Key wind chime
You will need a stick, some paint (optional), old keys and some string.
- Step one: Paint the keys and the stick to whatever colours you want.
- Step two: Tie a piece of string on either end of the stick, so that you can hang it easily.
- Step three: Tie a piece of string to each key.
- Step four: Tie the keys to the stick, make sure that they are close enough to each other that they will hit each other and chime when the wind blows.
Enjoy your very own DIY wind chime.
The Earth is everyone’s home, so let’s spread the word all about green living and have some fun while we do it, with these DIY projects.
Looking for more DIY projects? Talk to us, send a message to hello@iqiglobal.com or call us at 012-299-6155 or 037-450-6655.
Liked what you read? Check out this article next: 6 Insanely Easy And Creative DIY Projects
Be a part of our award-winning team of investors, click here: https://goo.gl/opBDxM


